Hello everyone!!! For this month's challenge I have altered a notebook's cover and worked on both sides with different techniques. I used gorgeous dreamcatcher chipboard and other ones as well. I painted the whole thing with Sprays (Mists and Metallics) and Embossing Powders.
Showing posts with label dream catcher. Show all posts
Thursday, 14 January 2021
Monday, 16 July 2018
Beautiful moments with Sprinkle mist
Hello Crafty friends,
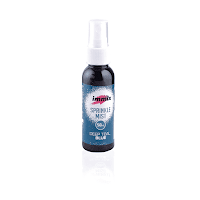
Shylaa here with you today and I’m going to share my inspiration with Teal & blue mixed media layout using Sprinkle Mist from Expressions Craft
Basic Steps for Mixed media layout
1.Cover page with gesso ( oh god i missed this, but our Sprinkle mist gives rich colours without gesso too)
2.Add textures to your layout using Modeling paste through stencil and let dry
3.Spray the colours directly over the textured part and mist it with water to create some drips
4. Add chipboard embellishments to page
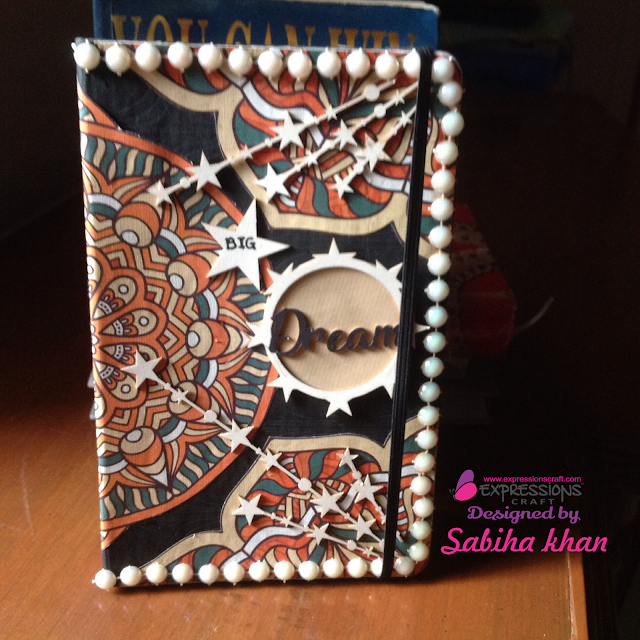
Steps i used to create this layout
This page was created using Teal and Royal Blue colours from Sprinkle mist! The Sunflower stencil well suited this page.
The Star hangings of Heart dream catcher was left with me. Added sprinkle mist directly with paint brush and adhered to the page.
The other chipboard embellishments are the Birds & branches and Bold sentiment
The Star hangings of Heart dream catcher was left with me. Added sprinkle mist directly with paint brush and adhered to the page.
The other chipboard embellishments are the Birds & branches and Bold sentiment
The next step was to create layers. I have used our Mandala decoupage paper and pearly laces to add layers. Adhered the photo to the diecut frame and added embellishments and handmade flowers.
The last step was to our our cute deco stones.
Some close ups
Hope i have inspired you to create something beautiful for our current month challenge.
Expressions Craft Products
IMMIX Sprinkle Mist - Deep Teal Blue & Royal Blue
Art Elements - Mini Decostones
Decoupage Papers - Mandala Design
Chipboard Embellishments
1. Birds & Branches
2. Bold Sentiment
3. Heart Dream Catcher
Stencil - Sunflower
Hope you enjoyed my post.
Stay tuned to more inspirations
Happy Crafting
Shylaashree
Tuesday, 12 June 2018
Dream Catcher With Chipboard
Hello, Friends
Dheepika here today.
What are you making for our current monthly challenge. Hope you are aware of the theme it Anything Goes.
I'm back with an Dream Catcher with our Chipboard.
What are you making for our current monthly challenge. Hope you are aware of the theme it Anything Goes.
I'm back with an Dream Catcher with our Chipboard.
A step at a time:
- Take a dream heart chipboard, trace the outline on a pattern paper and cut the shape of the outline.
- Paste the pattern paper below the chipboard.
- Attach the feathers on the bottom of the heart and hanging on the top of the heart.
- Add flowers and leaves at the top and bottom of the heart.
- Add small butterfly's on it.
- Colour the small hearts with metallic colors.
- Now the Dream Catcher is ready.
Video Tutorial:
Here are a few photographs of the project including close ups
Flower Making Tutorial
Dream Catcher Tutorial
Here are a few photographs of the project including close ups
Supplies list:
Thank you for visiting our blog again,
Don't forget to be awesome!
Dheepika vasudhevan.
Friday, 25 May 2018
Altered diary cover
Hi friends,
I am back on Expressions craft blog with a new inspiring post.
I am sure you all must be having a personal diary or journal. Everyone maintains a diary. How about an idea for altering its cover, I have come with a post where u can alter your diary cover and beautify it with Expressions craft decoupage paper and chippies embellishments.
I have used "Mandala 2" decoupage paper and beautiful chippies from "Circle sentiment set" and "Star danglers" by Expressions craft.
Lets have a look at my Altered diary cover...
I took the Mandala 2 decoupage paper and cut the centre circle and the corners along the pattern as shown.....
As I wanted some of the black part of my diary cover to show.
Adhered the paper with gel medium on the diary cover. I have used half cut pearl lines to cover the entire outline and used star and "DREAM" sentiment to further decorate my cover.
I have coloured the dream chippie with black paint and added a "BIG" sentiment on a star too.
Few more close ups I would like to share....
Hope u all like my project and would love to alter your journal or Diary cover....
Guys happy crafting....Use Expressions craft chippies and decoupage paper for these beautiful results.
Love
Wednesday, 23 May 2018
Mixed media layout
Hello everyone ,
I am Sheetal back with my GDT post today
I made a mixed media layout using the Expressions Craft stencils and chipoard cutouts.
Let me show you all few glimpse of my project followed by a video tutorial.
Here is my video tutorial
Supplies used
Sheetal
Subscribe to:
Posts (Atom)