Showing posts with label Wild Flower Stamp. Show all posts

Monday, 18 June 2018

Just For You by Steph

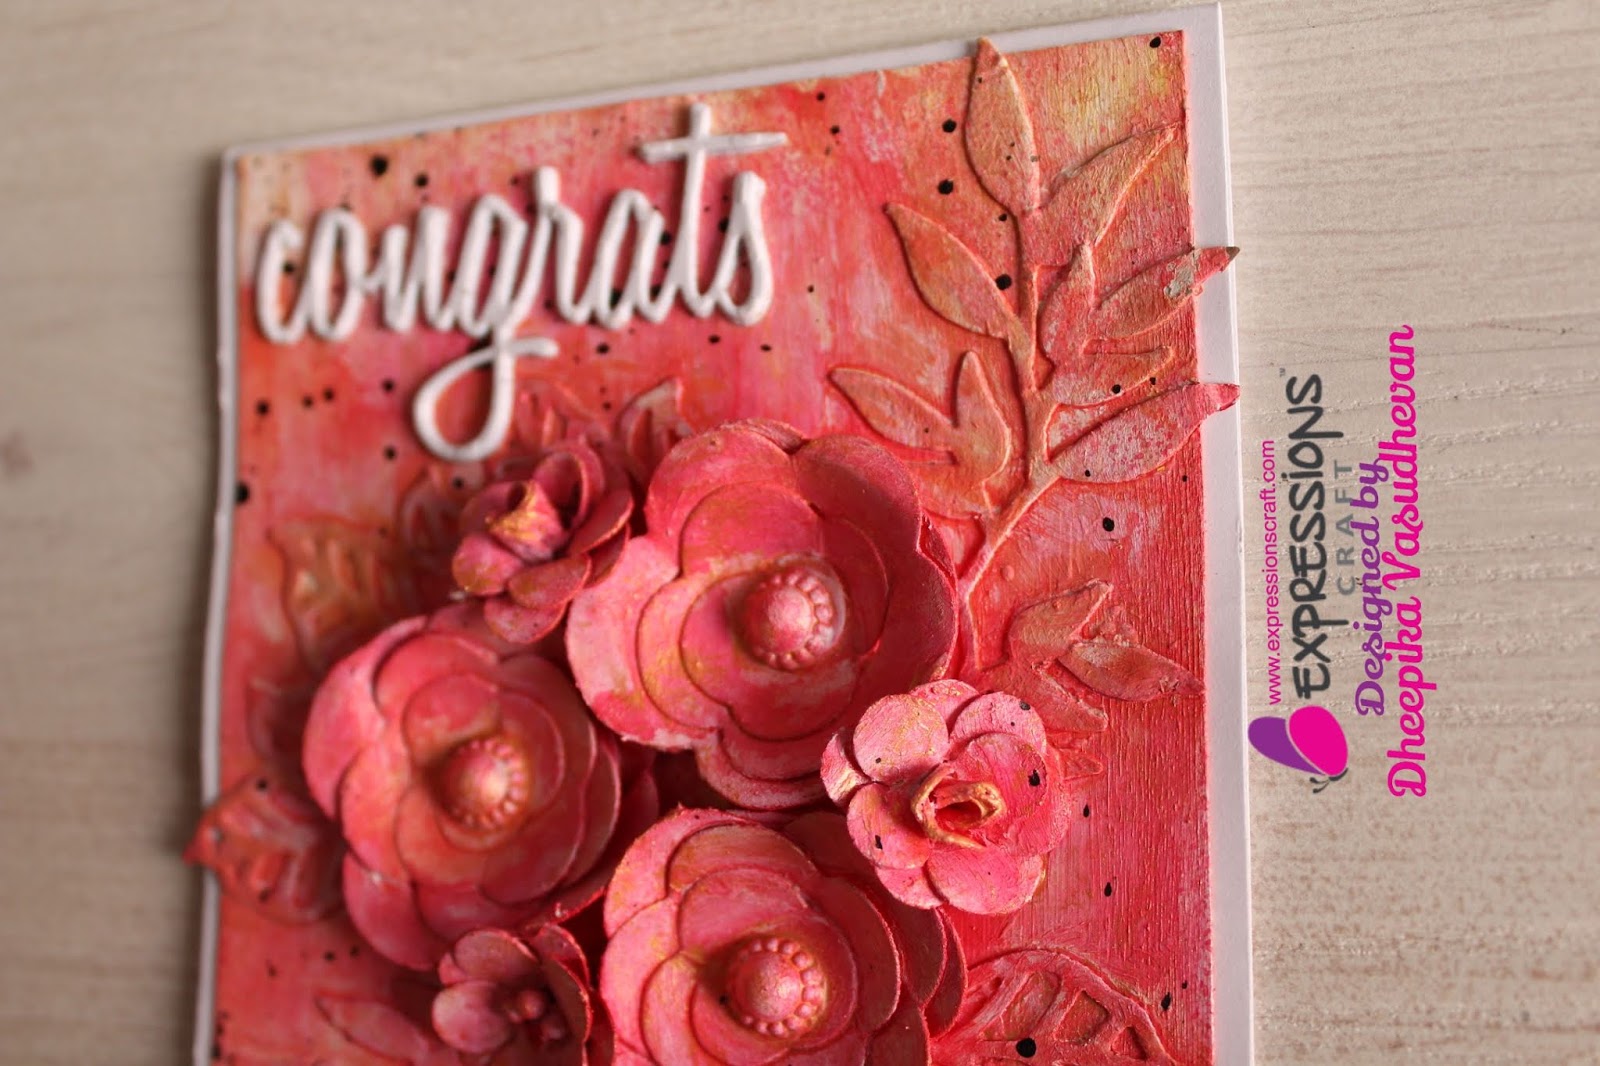
Hi everyone, Steph here today combining the Feather stencil with the Leafy Flora chipboard element.  


I used a piece of stenciled cardstock that was left over from another project I recently created.  To get the negative image, I spritzed the inked stencil placed it ink side down on white cardstock.  Then I  used a brayer to release the ink onto the white cardstock. 


The panel was cut to fit the card, inked with yellow and brown inks then matted with off-white cardstock.  Next, I wrapped the panel with twine then adhered the panel to a brown card.


The Leafy Flora embellishment was inked with assorted colors of Brilliance inks.


The Flora embellishment was added to ovals and then placed on the card with foam adhesives.  Gems were added to the flower centers and the sentiment was stamped, matted and placed on top of the ovals, slightly behind the embellishment.


Thanks for stopping by.

Look forward to your entries to our monthly challenge and the theme this month is Anything goes.

Thanks for joining.

Please stop by my blog for more inspiration.

Steph

Thursday, 7 June 2018

Just for you-Dress card


Hello crafty people,

Kirti here again. 
Here i am up with my another inspiration for our Monthly challenge. The theme this month is Anything goes.

This time I was inspired by idea of JUST FOR YOU!!

For a unique person, in our life, we would always want the things to be very special and unique. So, here is an idea for card very unique – A Dress Card. Have a look here.

I have made this handcut dress with card stock from Expressions craft & a floral paper from my stash. I have used the dress template attached here for cutting reference.

I have stenciled the background with colors using ornate panel stencil by expressions craft & have added sentiment from Flower stamp by expressions craft.


List of supplies used from Store,
Wild Flower


Thanks for stopping by..
Kirti

Monday, 21 May 2018

card - floral

Hello, Friends

Dheepika here and I'm back with floral cards today.
I have used cardstocks, stamps and stencils for today's project.


Card 1 - Congrats


Video tutorial:-


A step at a time:

  • Take a cardstock apply gesso on it and dry with the help of heat tool.
  • Once the handmade flowers ( used Expressions cardstock) are done apply gesso on them and let it dry.
  • Arrange the flowers on the cardstock.
  • Started spraying colors on the card and until I'm happy I added colors on it. Dry the colors.
  • Spray some golden shimmer on it and add some metallic colors.
  • Splatter some black color on it.
  • Add the sentiment congrats on the left top.
  • Now the mix media floral card is ready. 


Here are a few photographs of the project including close ups


Card 2 - Best Wishes


Flower making tutorial:-


A step at a time:
  • Stareted with die cutting the flowers and leaves.
  • Once the flowers are made.
  • Add the black cardstock to the base card.
  • Then arrange the handmade flowers and leaves on the cardstock. Add foam to the flowers and attach them to the cardstock.
  • Stamp the sentiment and add it on the card with foam tape at the backside.
  • Now the card is ready.


Here are a few photographs of the project including close ups


Card 3 - Just For You


A step at a time:
  • Started stamping the flower on a white cardstock and colour the flowers.
  • Die cut a circle, place the stencil and apply gesso on it.
  • Added sand on the stenciled area and sprayed color on it.
  • Again die cut in oval shape on the circle die cut to create some space to insert all the flowers.
  • On the the card base splatter some black color and paste the circle die cut with foam tape at back side.
  • Now the card is ready.


Here are a few photographs of the project including close ups


Thank you for visiting our blog again,


Don't forget to be awesome!
Dheepika vasudhevan.

Thursday, 26 April 2018

Simple cards using stencils and stamps

Hello dear friends,

I am back with some simple but elegant cards using Expressions craft stencils and stamps.

Here I have used beautiful "Funky flower" stencil and "Pine cone" stencil for the background and "Wild flower" and "Love Boat" stamp sets too.

First have a look at both my cards ......


These cards are super simple to make .....
Lets see how..
I took a water color cardstock for the base and used stencils to create my backgrounds for both the cards.
I have used distress inks and distress oxides to create the stencilled backgrounds. 

For the first couple card......Stamped the image and coloured it with Zig markers.Fussy cut the image and made waves out of a blue cardstock. Adhered the waves with double sided tapes to give it a raised look and placed the couple in boat image beneath it, as seen in the card. Finally stamped the sentiment Be Mine with archieval black ink.

Some more close ups .....


For the floral card....Stamped the wild flower image with versafine ink on a black cardstock and heat embossed it with Ranger gold embossing powder. Did the same with the sentiment "Just for you". Fussy cut the images and adhered them on the card. 


Simple yet elegant cards are ready...Give it a try, u will love making these.
Expressions craft has a variety of stencils and beautiful stamps. Try your own combinations and come up with beautiful cards.

supplies used


Hope my post has inspired you all.....
Thanks for stopping by.
Love 


Wednesday, 25 April 2018

Just for You Card by Steph

Hi everyone,
 Steph here using 2 different stamps from Expressions CraftsFor the floral image, I used the Flora stamp set, one of my favorite stamp sets because it has 5 different floral images and 4 different sentiments.  For the sentiment I decided to use the Wild Flower stamp set.


I wanted to showcase this beautiful flower so I stamped it on white cardstock and colored it with Copic Markers.  Die cutting it and matting with 2 larger die cuts really showcases the image, don't you think?


It looks stunning against a woodgrain type background.  Then I simply added a sentiment from the Wild Flower Stamp Set.


Thanks for stopping by.

Supplies List

Flora


craft stamps

Please stop by my blog for more inspiration.


Steph