Showing posts with label Hot Air balloon. Show all posts

Tuesday, 23 March 2021

"A reason to smile" romantic altered embroidery hoop

 Hello my creative friends,

It's Madhurima here and I am yet again here at the expressions craft blog with my new project inspiration. For today's project, I have altered an embroidery hoop using the wood grain pattern paper from the "Lushful Eden" paperpack as my background. Along with that, I have used chipboards and handmade flowers from expressions craft. I wanted to keep the colors as pastel as possible so have used shades of peach, lilac, teal and white. Here are some close-up images of my project. The product list is at the bottom of the post.


Products Used:

Products Used:
2. Stencil: Vintage style
3. Chalk paints:  periwinkle
4. Metallic spray: Peach Bloom and Silver night
5. Sprinkle mist: Titanium white
6. Metallic paint:  Pinky toes
7. Embossing powder: Tulip Rose
13. Fairy dust: blue


Thanks for stopping by and Happy Crafting.


Wednesday, 13 June 2018

Shadow Box card

Hi friends,

Hope you all are enjoying crafting and making something for our Anything goes challenge this month.


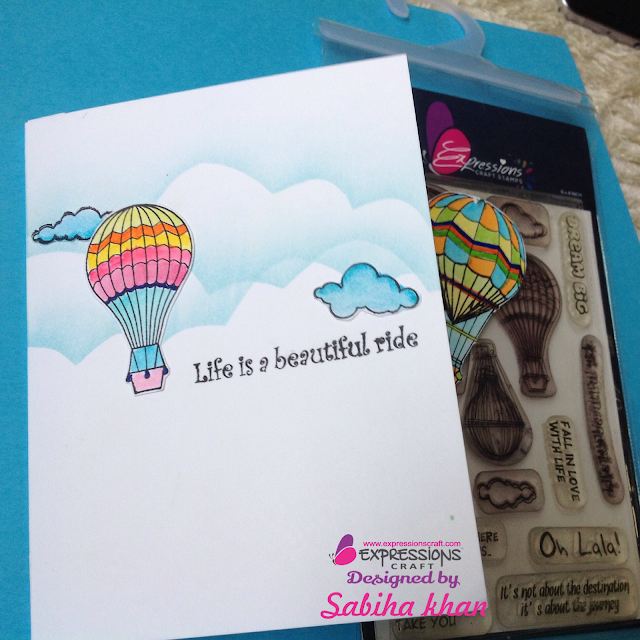
I am Sabiha again this week with my new inspiration post, Its a SHADOW BOX CARD..... made using Expressions crafts beautiful "HOT AIR BALLOON STAMP SET"

When I recently saw a shadow box card video by talented crafter "Jennifer Mecguire" I was sure that I am going to make one such card and the very next thought was stamp set by Expressions craft.

This stamp set was just perfect to make this card and I am proud to use such best quality Indian brand stamps...

Lets first have a look at my card ....


Hope u all guys like my card and now it must be clear how a shadow box card looks.

I stamped few balloon and cloud images from the stamp set on a smooth water colour card stock coloured and fussy cut them.
Took a 8 1/2 by 11 1/2 card stock for the card. Cut two pieces to make 5 1/4 by 8 1/2 size two card stocks. One serves the base card and another for the box.
I took one extra card stock little smaller than the inner half to make the skyline background.
For the front cover I made clouds using a hand cut stencil from acetate sheet and adhered the Balloon and clouds to make a scene.
Added the sentiment using archival black ink.
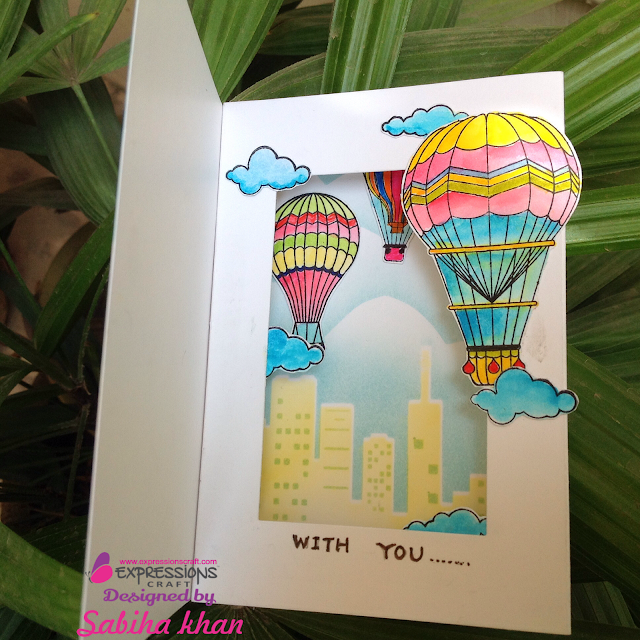
For the inner box card I made the box, adhered it to the card and before that adhered the background skyline stencilled image to give the depth to the card.
As you can see I have adhered the coloured balloons on the box as well as inside the card.
The scene was ready in no time and it looks so beautiful.
As I wanted to complete the sentiment I added "With you" on the inside of the card.
If you want a detailed video of making such shadow box card hop on to Jeniffer Meguires you tube channel.
You can make many such shadow boxd cards using expraftessions craft stamps and your imagination....

so......what are you waiting for?

Get inspired and take part in our ongoing blog challenge #1 "anything goes" and also participate in our "share n win" contest.

I would like to share few more pics of my card....


See u soon guys with your new creations...


If u loved to read my post please leave some love in comments below.

Link to buy this stampset is below


Bye...


Saturday, 10 March 2018

Layout for a Baby Boy

Hello dear friends,

Today on this Expressions Craft blog I am sharing a cute n lovely layout for baby boy pictures.

It was Women's  Day on 8th March. A women is always a loving mother at heart and she never wants to forget her little ones baby days. In today's project I am making this layout for little baby boy pictures to cherish the memories forever.

When I received all the stamps from Expressions craft , I was sure I may use all of them in my single project. As all these stamps complement each other. The three stamp sets I have used are "Hot air Balloons", "Shopping for my baby" and "Oh my Baby". I have also used Wooden rectangular decorative frames from Experssions too.

I am going to share pictures  as well as a video to show how I made this lovely layout.
Yes, a video too. I am equally exited to share this with u all.

I would like to share some pictures first, and then a video with explanation.


Few close ups too.....


Guys, hope u all like this cute layout. It is truly easy to make this using "Expressions craft
 stamps" and "Wooden rectangular decorative frames".

I will show u how.
First I will show u few basic things to prepare for the layout. U will need a 12" by 12" pattern paper for the base. To make it sturdy u can stick it on a chipboard. It is optional. I took all the stamps which I wanted to include in my layout. Stamped the images using Archieval jet black ink on a smooth water colour paper. The results were too crisp and fine. I was too happy with the results.Coloured all the images with water colour. Took both the wooden frames and coloured them using sky blue chalk paints. Took some pattern paper and cut it into few stripes for decoration. Made Rossetti's out of paper too. I have also used few  stars and a "baby" die cut .And off course the pictures of baby. Cut the pictures accordingly to fit properly inside the frames.
It was too easy to assemble all the images and pictures to make this beautiful layout.

Lets see how, in this video.


Friends, Hope u all will be able to try this simple and beautiful layout using Expressions craft stamp sets and Wooden rectangular decorative frames. 

You can buy the supplies used in this project from our store by clicking the below link


Bye friends. Leave some love and comments below if u like my post. N do try this out.
Hope to see u all soon with my new creations.

Love Sabiha.