Saturday, 28 October 2017

Shaker gift tags

Hello Dear Friends!!!!

The moment i saw the stamp set - oh my baby stamp i completely go ga over it , they are so adorable and cute.I created two shaker gift tag.
Have a look!!!!
For creating the  shaker tag  i  first die cut a acrylic sheet and white cardstock with circle die.
Next die cut a circle frame with white cardstock and foam sheet , inked the cardstock circle frame with spiced marmalade ink. Stencil the circle cardstock with distress ink using Waves stencil.
Sandwich the acrylic sheet circle in between cardstock circle and foam circle frame. Fill beads in between the space. Stamp the baby image and sentiment from the Oh my baby stamp set and paste on top of acrylic sheet. 
 For this tag background here i used Daisy Delight stencil with distress ink Peeled paint and moved lawn.
 Isn't this cute little boy here is adorable.

Hope you like my work for today and will try to make one of yours.
Hugs 
Pavitra

List of supplies used.

Thursday, 26 October 2017

stencil cards

Hi crafty friends
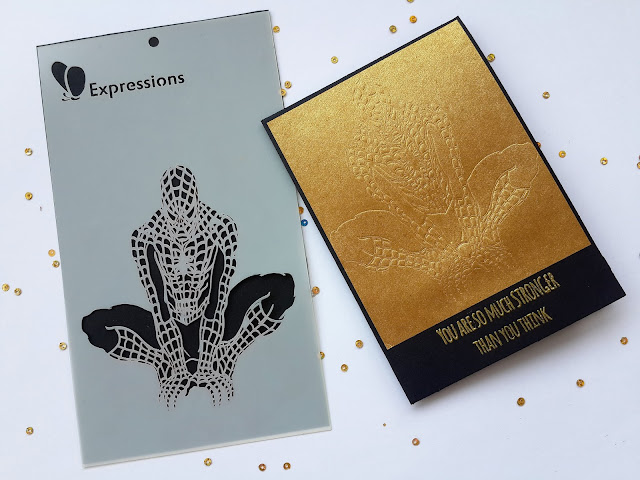
Today i would like to introduce our special Guest DT of this month.  Sh e has done a fabulous job in creating cards using our Expressions stencils. Very Happy to introduce Ms. Radhika and below are the cards done by her. Thank u Radhika for these beautiful cards.

Below are the stencils used and she has made 7 different cards. Each and every stencil she has used in an innovative way and the output is awesome.


First card using:

Ornate Panel and Traditional Motifs


Second Using:
Doodles


Second Card using:

Doodles


Third card using:

Doodles and Traditional Motifs


Fourth card using:

Deepam and Doodles

This card is really very creative one and the way that she has created leaf is superb, extra ordinary creativity :)


Fifth card using:

Traditional Motifs and Ornate Panel


Sixth card using:

Amazing Spiderman


and the final card using:


Hope you all enjoyed viewing these card. If this really inspires you then we will be very much happy, and looking forward for your valuable comments and suggestions. Thank u Radhika once again for giving such beautiful inspirations. we will be bringing out such creative artists and their talent in near future. 
Happy crafting
Expressions stamps team
https://www.expressionsstamps.in/


Picnic - Sun n Fun

Hi Crafty Gals.....

Today I'm sharing a new stamp set  which was newly released with Expressions Stamps. Its total fun with lovely share of party set.


I have made an easy card which goes well with the theme.  I have used Papericious Whimsical 6"x 6" pattern paper set for this card.  I have chosen a pre stamped printed paper and used Spell binder die-cut Circle die and cut the center of the pattern paper and over layered the image which was stamped and colored on a water color paper with Zig Real Color Brushes and backed with foam pads I have adhered it to another plain CS which was in the Whimsical set. This gave a shaker box kind of depth and dimension.......I wanted to keep this plain and hence didn't do a shaker kind of card. Ideas are many but still for me the focal was the stamp set which gives a crisp and clear image.


I didn't do a step by step tutorial for this as this was a kind of self explanatory and a very easy peasy kind of a card.

You can get this lovely stamp set and paper pack from below link from below link

https://www.expressionsstamps.in/shop/picnic/

https://www.expressionsstamps.in/shop/whimsical-2/


Will surely share few nice inspiring stuff in the coming weeks!!

Happy Crafting!!

Cheers!!


Hema

Wednesday, 25 October 2017

Stenciling with Fashion Divas!

Hi to all!

Hope you all enjoyed this Diwali with all your family members, relatives, visitors! Now time to show some more creative work!

Weaving stencil and  Fashion Divas stamps from expression stamps. I really love the quality of this brand.
I could make many cards from weaving stencil with so many possibilities!
So I decided to make two cards using this beautiful stencil.


For the first card, I combined my stencil with pretty Fashion Divas stamp set. They are so stylish, bold, sassy, confident and carefree teenagers!


Firstly, I placed my stencil diagonally and coloured the weaved pattern with my watercolour brush pens shown in the pic.


           I choose Fashion Divas stamp set and stamped two of the images on my watercolour sheet in the jet black. Then quickly applied clear embossing powder on them and heat embossed the images, see the difference and more good result!


                         I love how quick and easy the Staedtler watercolour pencils are to use and they give the beautiful watercolour results. Fussy cut them and don't forget to apply black ink pen at all along the edges of the image for the best result:)


                        Die cut a black banner. Stamped the sentiment from the same set and heat embossed it.
Now popped up my fashion girls and banner with dimension to create more interest.


Isn't it so much fun, love the bold, bright look of stencil pattern with these Fashion Divas- so happy!

Supply list:
Cardstocks: Black and white colour heavy CS, watercolour sheet
Stamp: Fashion Divas from Expressions craft stamps
              https://www.expressionsstamps.in/shop/fashion-divas/
             
Stencil: Weave Pattern from Expressions craft stamps
               https://www.expressionsstamps.in/shop/weave-pattern-2/

Die: Dotted rectangles from Sizzix
Archival Jet Black ink
Japanese watercolour brush pens- Blue, orange, pink and black
Staedtler watercolour pencil set
Embossing powder: clear embossing powder and opaque Bright white from Wow
Pop foam dots and Fevicol


                                                                          For the second card

I paired the beautiful stencil with a flower die and some pearls to make an elegant card!


                      Firstly I applied embossing paste at the bottom of my card panel and after removing the stencil quickly splattered some diamond dust on it before drying. So sparkly and glittery, made me smile!


                      Die cut a flower from watercolor paper and used my Zig markers to color them. To add a little sparkle I added some crystal clear dust to the flowers using clear tacky glue. Die cut a phrase sentiment out of a silver sparkly sheet and adhered at the top.


I added the flowers to my card with pop dots. I bent the one flower a little bit so it was moreover to thinking of you phrase and added some pearls! And lastly added a gorgeous clear sparkly white ribbon with a cute flower bow! Now adhered the whole panel on my dotted holes card base using pop dots.


Love the elegant and clean look!

Supply list:

Cardstocks: White Heavy cardstock; silver sparkly sheet

Stencil: Weave Pattern from Expressions crafts stamp

               https://www.expressionsstamps.in/shop/weave-pattern-2/


Die: field of dreams from Penny black and dotted holes rectangle nesting die from Sizzix; Thinking of You from Spellbinders

Zig Clean Watercolor Real Brush set
Georgette clear sparkly white ribbon, pop foam dots and some half pearls

Thanks so much for stopping by. 
Have a wonderful Day!

Vinita


Saturday, 21 October 2017

Stamped butterfly cards

Hello lovely people

First of all Wishing you a very Happy Diwali, hope you enjoyed the festival  thoroughly. Post Diwali i have some lovely card with gorgeous butterflies , i really like butterflies a lot , they are so tiny ,beautiful and delicate yet so strong and joyful. The Happy Fly stamp set from Expressions stamps is one of the stamp set i really adore, the images are really gorgeous and also have lovely sentiments.
My work for today focuses on the same stamp set . I  kept the background simple to let the butterflies stand out more.

Here is the card no - 1

For this card here -
Cut white cardstock 12 x 6-1/2 , score at 6 and fold. Next cut mustard colored cardstock 6-1/4 x 5-3/4 and layer on top of white cardstock.
 Cut iris cardstock 270gsm 6 x 5-1/2 . Stamp the butterfly images on one side of the cardstock with various shades of distress inks - Pine needles , mermaid lagoon , aged mahogany, spiced mermalade , chipped sapphire , dusty concord.Fill up the in between space of bigger butterflies with small solid butterfly image using distress ink hickory smoke. Layer this on top of mustard cardstock.

Cut iris cardstock 1-1/4 x 2-1/2 , apply a coat of brown dimensional paint, stamp the sentiment on a piece of iris cardstock , distress the edges with distress ink and layer with 3D foam tape.
Card no - 2


For this card -
Cut white cardstock 12 x 7-1/2 , score at 6 and fold. Cut purple foiled cardstock 5-3/5 x 7-1/4 and layer on top of white cardstock with glue.


 Cut iris cardstock 270 gsm 5-3/ 4 x 6-1/2 and cut it two halfs diagonally.Score this half at every 1/4 inch and ink with purple , gold , pink and dark blue shades of  acrylic paints.Layer this on lower half of the card base. 
On the upper half of the card base splatter black acrylic paints.
Next Die cut a curved frame and heat embossed with gold embossing powder. Stamp the butterfly images with versamark sticky ink on a piece of iris cardstock and heat emboss with black embossing powder.
Color the background with distress ink picked raspberry and dusty concord using a brush. Color the butterfly images with purple  watercolor pencil. Frame the butterfly using the embossed frame diecut as shown.
Stamp the sentiment with black archival ink.


Hope you liked my work for today

see you soon for the next blog post. Below you will find out the list of supplies i used for today's card.
Till than take care 
Hugs 
Pavitra

ECS Supplies

https://www.expressionsstamps.in/shop/happy-fly/

Other Supplies

Cardstock - white , iris , purple foiled

Distress inks
https://www.expressionsstamps.in/product-category/ink-pad/

Embossing powder & versamark ink

Acrylic colors.
https://www.expressionsstamps.in/product-category/acrylic-paint/


Tuesday, 17 October 2017

Ethnic Diwali Cards!

Hello to all!

I am back again with new inspiration!

Diwali is a most famous festival of lights celebrated in India. Each of the Hindu people started planning before a month to celebrate this festival.  Invited their friends and family members and wishes them! So I created an ethnic and festive Diwali Cards!

I have combined the two different stencils to create my first Diwali Celebration card!


My card base is in bright yellow. I took the daisy floral stencil and cover the half of the front card Using carved pumpkin ink. I stencil the design as shown in the pic with Ombre effect.


 Then I took Candied apple ink and stencil the design again overlapping it, love the result!


    Now I die cut one small and one big circle to make my own stencil. I covered the white border layer with my circle die sheet and put the daisy floral stencil and applied the ink (Keep the small circle between the daisy floral stencil to keep the circle white). Now I wanted to highlight a Diya only. So I covered the white border sheet again and applied ink through the Diya stencil. Now distress the edges applied candied apple ink.


                                 Die cut the borders out of bright red and whisper white CS.


               Die cut celebrate word and now applied both the layers at my card base as shown in the pic. Now time to embellish it. Highlighted it with few gems and yellow glitter glue dots.

Here is the beautiful inside too!


Supply list:
Cardstocks: Bright yellow, red and Heavy white CS 300 gsm
Stencils: Daisy Delight and Diya from Expressions Craft Stamps
Dies: A2 Scalloped Borders-Card creator dies from Spellbinders, Celebrate from Die-namics Nesting circle dies from WeRMK
Distress inks: Carved pumpkin, candied apple, fossilized amber, ground espresso
Round foam Blender: Tim Holtz
Big Shot
Glitter glue: Yellow iridescent
Other materials: Masking tape, orange-yellow color gems

Here is the second card!


    For this card, I applied several colors using Daisy Delights stencil as shown in the pic.


                 Then I die cut the sentiment Hello out of stick it adhesive sheet and one from white foam sheet. Applied crystal glass clear Diamond dust. The procedure is shown in the pic. And placed the word phrase on my one layer card with a silver thread and few sequins and some glossy accents drops.


Supply list:
Cardstock: Heavy white CS, white foam sheet
Stencil: Daisy Delight from Expression craft Stamps
Altenew Inks: Warm sunshine, evergreen, frayed leaf, sea glass and desert night
Die:  Hello word from Sizzix You & Me set
Finger daubers
Stick It adhesive sheet from Ken Olivers and crystal glass clear Diamond dust
Glossy accents; B & W Classic Cup sequins and double shade silver thread

Hoping I inspired you to make some Diwali card preparations to celebrate this festive occasion!

Hope the festival of lights enlightens your home and heart with peace and serenity. Wishing you loads of joy and happiness on Diwali!!!

Vinita Jain