Thursday, 29 March 2018

Just For You Card

Hi everyone, 
I am Steph here today to share some inspiration on the Wild Flower stamp.


Using Misti, I lined up a panel of white cardstock, then stamped the flower with purple inks.  The stem was stamped with green inks.


I placed the stamped image inside a Designer Rectangle Frame that I painted with Plaid paint.


To create the card, I embossed a panel of foiled paper and adhered it to the card.


The Designer Rectangle Frame was added to the card on top of a strip of gold foil.


The sentiment was stamped on white card, inked and added to a strip of foil and adhered to the chipboard.

You can buy this stamp from our store by clicking the below link


Thanks for stopping by.

Please stop by my blog for more inspiration.

Steph

Monday, 26 March 2018

Mix Media Journal Cover!!

Hello, Friends
Wake up, shine and smile today because it's Monday!

Dheepika here and I'm back with Mix Media Journal Cover. It is simple and easy to do.
I totally enjoyed creating this journal cover.


A step at a time:
  • Take a A4 size black card stock and fold it into half and add some folded plain papers into the black card stock. 
  • Staple the paper at center and the journal is ready.
  • For the cover take two white panels slightly smaller than the black card stock.
  • Apply gesso on the white panels and dry with help of heat tool.
  • Spray the colors on the white panels and let it dry.
  • Take the stencil place it on the center and apply gesso on it and dry with the heal tool.
  • Then paste the white panel on the black card stock one at the front side of the journal and other at the backside of the journal.
  • Paint the Buddha with black paint and shade the Buddha with metallic gold color.
  • Paste the Buddha on the front side of the journal and add some sequins.
  • Now the mix media journal cover is ready. 

Here are a few photographs of the Journal including close ups


Supplies list:


Thank you for visiting our blog again,
Don't forget to be awesome!

Dheepika vasudhevan.

Friday, 23 March 2018

Butterfly cards with Expressions Crafts

Hi everyone, I am Steph here and have got a set of cards for you today using the Happy Fly stamp set.  I love butterflies and this set includes 7 butterflies along with 5 sentiments.


Using the MISTI, I placed a sheet of cardstock inside, then arranged the butterflies about the panel, leaving room for the sentiment in the corner.


Next, I inked the butterflies in assorted colors.


I repeated the inking until I had these amazing butterflies.  The sentiment was added in the corner with black ink.


After inking the panel with yellow ink, I matted the panel with black cardstock and added it to my card.  Finally, I scattered some gems around the card.


For my second card, I arranged the butterflies around the sentiment.


I inked the butterflies with blue ink.


Then I inked them with yellow and red inks.


I inked the panel with blue ink, matted it with black cardstock and added it to my card.  Finally, I stamped the sentiment in black ink and die cut it.  After adding it to a larger circle, I adhered it to the card and added gems.


Thank you for stopping by today.

You can buy this stampset from our store at the below link

Happy Fly


Please stop by my blog for more projects.

Steph

Thursday, 22 March 2018

Card for daddy b-day

Hello Crafters,

I am Fabiola here, to share a card which was dedicated to our father on his birthday.


You can buy the products used in this project from the below link

Thank you for visiting

Fabiola

Wednesday, 21 March 2018

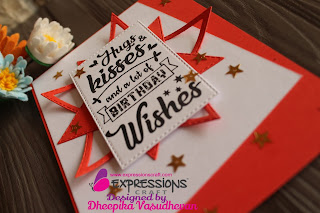
Hugs and Kisses

Hello friends!

I'm Dheepika and I am here to share the process of making cards using the expression craft stamp.


A step at a time:
  • Take a base card measures 5 1/2" x 4 1/4" in red colour and paste the white panel diagonal and trim the excess.
  • Die cut the star shape and paste one over the other (as shown in the image).
  • Take a rectangle die cut and stamp the sentiment. Add foam at the back of the sentiment and paaste it on the card.
  • Add some sequins.
  • Now the card is ready.

video tutorial:


Here are a few photographs of the cards including close ups


Supplies list:

Thank you for visiting our blog again,
Don't forget to be awesome!

Dheepika Vasudhevan.

Tuesday, 20 March 2018

Thank You with Feather Stencil

Hi everyone, Steph here today with my first post for Expressions Craft.


I used the Feather Stencil to create the background for my cards along with the Happy Birthday stamp.


Here's my video of the process.


Here is the link to buy


Enjoy.  Please stop by my blog for more inspiration.

Steph

Monday, 19 March 2018

Simple Sentiment

Hello friends!

I'm Dheepika and I am here to share the process of making cards using the expression craft March Release Stampset.

A step at a time:
  • Die cut the lager rectangle piece in black card stock.
  • Take some scrap pieces in different color and cut them into strips.
  • Start pasting one by one in different color on the lager rectangle die cut piece.
  • stamp the sentiment and die cut it. paste the sentiment on the larger rectangle die cut piece.
  • Take a base card measures 5 1/2" x 4 1/4" in white color and paste the larger rectangle die cut piece on it.
  • Now the card is ready.


video tutorial:


Here are a few photographs of the cards including close ups


CARD:2


A step at a time:
  • Take a white card stock and add few splatters on a card base measures 5 1/2" x 4 1/4".
  • Create thin square pieces in different color with dies and paste the on the base card.
  • Die cut some butterfly pieces and glue them together and add at the center of the square die cuts.
  • Stamp the sentiment on the bottom of the card and add some bling.
  • Now the card is ready.

video tutorial:


Here are a few photographs of the cards including close ups


Thank you for visiting our blog again,
Don't forget to be awesome!

Dheepika Vasudhevan.